Feeds:
Posts
Comments

Archive for the ‘Community gardens’ Category

Garden boxes in June

Garden boxes with thriving occupants

It’s almost the 4th of July and I thought it might be a good time to document how we built our garden boxes at our new place. This was quite an undertaking, but as you can see, our veggies are growing fabulously. We’re especially excited to see the tomatoes and melons really take off.

First thing we did was look back at the construction of our last raised beds.  Our redwood retaining wall was crumbling from age, so we replaced the redwood with castlewall blocks and extended the same idea to build a raised garden.  It did the job, but because layering the blocks makes the area smaller as you go up, you lose some space. Also I definitely wanted narrower beds so we wouldn’t have to climb up the wall and put down a walking plank to get to the middle of the bed. Lastly, castlewall blocks are much more expensive (~3x) and laborious to build than using plain lumber.

Former raised garden beds

Former raised garden beds built with castlewall blocks - expensive!

We also learned from our new neighbors that ground squirrels could be pretty destructive, so we added gopher/chicken wire to our materials list. Top soil/compost mix was also necessary to amend our red clay soil which turns to concrete in the summer.

Because we wanted roots to go down deep, we made sure to loosen up and till the clay soil that would be about 18 inches beneath the surface of the amended soil (this was in April so it was still easy to work the ground). In addition, we mixed in fir mulch, our own compost, and fallen, semi-composted oak leaves we found on the property.

Living in California means having easy access to redwood which is naturally rot resistant. Another option would be cedar. One should avoid pressure-treated wood anywhere near the garden because it commonly contains CCA (chromated copper arsenate) or other types of chemical pesticides which may seep into the surrounding soil. Interestingly, the redwood planks we bought at Lowe’s were just as expensive, if not cheaper, than pressure-treated lumber.

Next we thought about the ideal width for the boxes. We decided on 4ft as this would make it easy to walk around the garden, weed, and harvest veggies. It also meant less wood cutting as we used 8 ft.-long planks.  As for the length, we decided to join two 8-ft.-long planks to create 4 x 16 ft beds.

Supplies for a16ft x 4ft x 12in-high garden box:

  • five 2×12″ x 8ft redwood planks, one cut in half to make two 4ft ends
  • four 11 1/2″ sections of 4×4 in redwood post (used 2×2 posts on one bed and it seems fine)
  • two 4ft sections of 2×2″ redwood posts (to keep the boxes from warping or twisting)
  • two 4″-long 2×2″ redwood posts
  • twenty-four 3 1/2″ wood screws
  • sixteen 2″ wood screws
  • sixteen ft of 6ft tall gopher/chicken wire (hardware cloth would be better and last longer, but it’s more expensive)
  • lots of staples

Tools used: 1/8 drill bit, drill, hammer, screwdriver bit, square, 4-ft-long level, heavy-duty gloves (when handling chicken wire), electric staple gun

There is a slight slope to the garden area. We didn’t level the ground before we started, but we dug down the high side an inch or so before assembling the boxes.

First we laid out all the boards approximately where they would go. Then we picked up one end and one side board and squared them up. I suggest that the 8ft boards go on the outside of the 4ft board. That way your garden is exactly 4ft wide on the inside. I fastened the boards with two 2″ screws to make an “L”, then took the next 8 ft plank and attached it to my “L” to create a “U” shape. I followed this same procedure for the other side of the box till I had two 8ft “U”s facing each other.

The next step was to level and square up the “U”s.  Once we were pretty close to level, we checked the diagonals by measuring the distance across the bed in an “X” pattern. The two measurements will be close if your bed is truly square. If one side’s diagonal is longer than the other, go to one of the corners of the longer diagonal and push on the end of the board. If you are off by an inch, then only move a half an inch and re-measure diagonals.

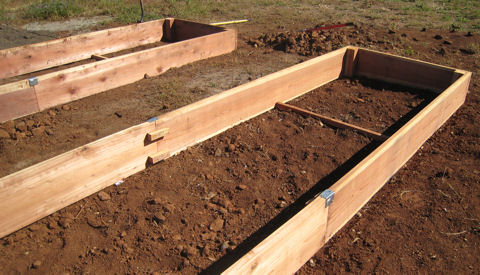
Two "U" sections joined together for garden box.

Two "U" sections joined together for garden box. Crossbars keep the boxes square.

Once the garden beds are level and square, connect the two “U”s together using either straight metal brackets or ~4″ piece of 2×2″ redwood as shown in the picture above.  Don’t worry if it doesn’t line up perfectly, but it should be pretty close if your box really is square and level.

Now to stiffen the box and keep it square: cut the 4×4″ posts to 11 1/2″ height, insert into each corner, and fasten them with 3 1/2” screws. Then 4ft from each end at the bottom of the bed, fasten the 2x2in 4ft redwood segments.

Stiffen box by fastening 4x4 or 2x2 pieces of wood at corners.

Stiffen box by fastening 4x4 or 2x2 pieces of wood at corners.

I had been walking and sitting on the inside of the garden boxes quite a bit, so I turned the soil one last time. It’s really important to keep the soil “fluffy” as roots also need air.  From here on out I didn’t step on the garden beds.

Toughest part was stapling gopher wire on inside of boxes.

Toughest part was stapling gopher wire on inside of boxes. Remember not to step inside the box to keep soil fluffy!

Roll out the chicken wire and line it up (it’s good to have a helper hold the other end). Don’t cut the wire until you get close to the end, as I found that I needed to cut more than I had initially guessed. After building my first couple of beds I got a good feel for how much extra to leave before cutting. I started by stapling in the middle of the 4ft end and working toward the corners. At the corners, I would push the chicken wire in as tight as I could and staple more there than along the length of the beds.
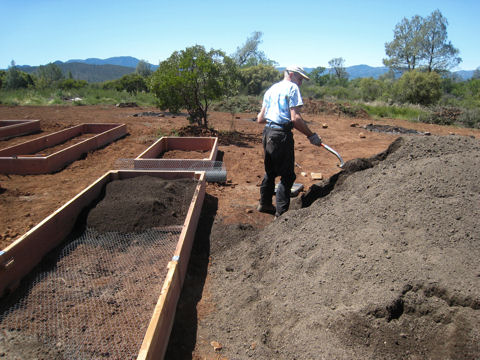
Filling beds is the best part of building garden boxes!

Filling garden boxes is the best part of building them. But yes, I was rather exhausted when this picture was taken!

Finally – the fun part that the whole family can enjoy! Fill the box with amended soil.  We were able to get seasoned horse manure at the local stables so we mixed some of that in as well.

Note that soil will settle once your bed is filled. It is best to water and wait at least one week before planting. Some vegetables can be stunted if the roots are disturbed as they are germinating. I noticed about an inch of settling in our 12″-high beds. So if you can wait just a little bit longer, it’ll pay off in the end!

Read Full Post »

Ahhh, summer!  You’ve probably harvested several lbs. or meals of your favorite tomatoes, lettuces, beans, potatoes, and those lovely cole crops – broccoli, cabbage, radishes, chard!  The garden even looks glorious basking in that August sun.  But wait, there’s warfare going on in this idyllic scene.  WAR, you say?

Oh yes, just because you can’t see it, it doesn’t mean it’s non-existent.  The soil-bearing fungi are whetting their appetite to get those sugars from the leaves or roots and decompose the plant, but even more obvious are those critters you DON’T but CAN see … ONCE YOU TURN OVER THE LEAVES!

Check what's going on under the leaves.

Check what's going on under the leaves.

Yes, you’ve worked on the preparation, the maintenance, weeding, etc., but do not rest on your laurels as veg garden work is not complete till it reaches your mouth!  And that is what many new gardeners neglect:  touching the leaves, turning them over, trying to ID what critters are munching on THEIR dinner, and what they’re going to do about them.

Cabbage worms devastating broccoli leaf!

Cabbage caterpillars (not loopers) devastating broccoli leaf; aphid on right.

So hear’s an example of Roy looking under the leaves of the Calypso bean plant.  Hm, not snails.  Probably a caterpillar.  He looks for the culprit.  Gets out a book (see below) for ID.  Reads prognosis and treatment.

Moves on to the next plant. Broccoli. Ewww, found the critters. Caterpillar stage chewing up the leaves. A sole aphid in the corner. Roy’s thinking, maybe BT will take care of that, insecticidal soap for aphid or lacewing treatment.

To help you ID and do something about these garden pests, here’s a suggested list of references for the veggie garden:

And if all fails, just send us a tweet with photo on Twitter and we’ll try to help you ID your pest!

P.S.  Roy’s solution to the cabbage caterpillars is smushing them and applying BT tonight before the infestation gets worse.

Read Full Post »

This last section on companion planting (CP) sums up practical ways to cultivate a healthy garden with some “built-in” natural protection.

Intercropping vs. monoculture

By this time, you should be convinced that intercropping to create a diverse vegetable garden “habitat” is most effective to naturally protect your garden from pests, and can potentially enhance the yield of your favorite crops. Monoculture not only makes your valuable veggies more susceptible to pests in one season; sometimes, despite your efforts to work in rich, organic fertilizers, the same family of plants grown in the same area will fail in later seasons.

We learned this the hard way as we were initially concerned about having too many different veggies with too little yields.  As it turned out, yields started falling in later years as our broccoli became more susceptible to pests (BTW – brassica family, unlike tomato plants, generally like to be moved around).  So be daring, be bold, and experiment with different veggies – even those you think you’d never like!

Exploiting garden warfare

Your lovely spring garden or the woods near your home may look “serene”, but in truth, there’s constant warfare going on at a physical and chemical level.  So why not take advantage of it?

For instance, sunflowers may be great weed deterrents as they were found to be strongly allelopathic to weeds like wild mustard, jimsonweed and ragweed (Ref 1, p. 310).  Or what about selecting a “sacrificial plant or soldier” to protect the more valuable crops?  For instance, kale can be planted at borders of other more valuable cabbage family plants to draw pests away.  Or black nightshade can be used as a decoy plant to attract Colorado potato beetles away from your potato plants.  This may not be the best option for those of you with tiny gardens, but try to think of creative ways – even using containers which can easily be moved around – in deploying “soldiers” to protect your cash crops.

And while we’re on the subject of war, keep in mind that CP is not necessarily a mutually beneficial combination.  Some gardening experts believe that it is almost one-directional, though this can be difficult to ascertain.  For instance, you might consider that if carrots were planted next to peas or tomatoes (as our comparison of CP guides suggest), would yields from peas or tomatoes be greater at the expense of the carrots?

Using ornamentals to attract beneficials and help control pests

Many gardeners certainly deploy ornamentals like nasturtiums and marigolds to protect plants from pests like aphids, detrimental nematodes, white flies, and other pests.  But having herbs and flowering plants (esp. daisy and parsley families) also benefits the vegetable garden by attracting beneficial insects and birds that eat nasty bugs or pollinate plants.

We have had success growing tomatoes and beans with marigolds in containers, but have yet to attribute the yields/health of the plants to the marigolds. Some CP guides will suggest different varieties of marigolds for different pests (African, French and golden marigolds appear to be the best varieties).

Nasturtiums (whose flowers are a mildly peppery but delicious and attractive addition to your salad!) do have to be kept in check as they can take over an entire area, and are an incredible snail magnet on the West Coast.

Recording your own companion planting results

If you’re really intrigued by companion planting and want to put it to work for your garden, then record your observations.  Your best CP guide is your own gardening experience, though keeping in mind that results may not always be reproducible (see Part I).  A simple notebook or spreadsheet works perfectly well (of course, there’s Plangarden, too 🙂 )  Some variables to keep in mind are the yield and planting distance in the control vs. experiment plots.  For the die-hard garden geeks, we refer to Anna Carr’s excellent book (Ref. 1, pp. 332-355) that offers experimental techniques.

Good luck and may the companion forces be with you!

Read Full Post »

Avid gardeners like ourselves have sometimes been stumped by the conflicting information you’ll get from different gardening pros and horticulturists.  Sometimes they’ll even contradict themselves.  Or worse, you’ll set up a companion planting scheme and discover that the insect repellent properties of, e.g. garlic to repel red spider mites from tomatoes, was completely ineffective in your particular garden habitat.

So we created a survey of plant companions from four sources to ascertain which combinations they generally agree/disagree on, with the understanding that observing and documenting our own results is really what matters in the end … though may not always apply every season!

Click here for PDF version of summary tables - copyright © 2009 Plangarden

Click here for PDF version of summary tables. © 2009 Plangarden

A PDF of the tables appears on the right.  More details are in the slideshow below this post. 

Here are some useful terms often used in the context of CP: allelopathy and phytotoxins. Allelopathy (allelo– “one another”, and –pathy “disease or suffering” from Greek) refers to how plants find ways to stake out their territory, often by harming nearby neighbors.  They may release phytotoxins (phyto– meaning “pertaining to plants”) which essentially attempt to knock out nearby competitors.   Phytotoxins can sometimes also repel insects and other animals.  

Some notoriously allelopathic plants harmful to the vegetable garden (though may be great at deterring pests which we’ll discuss in Part IV) are the eucalyptus, black walnut, and absinthe wormwood.  Make sure you know what lies just outside your property line if you decide to grow vegetables in that area.

Limited research has gone into subsoil fungal activity and its respective role in companion plants.  Some speculate that both beneficial and harmful compounds may be transmitted through the mycelial network – though it’s impossible for everyday gardeners to ascertain “fungal contributions” to the companion plant ecosystem.

In the end, what we suggest is to “not get overwhelmed” on which combination of plants will produce the ideal garden.  Our “strategies” post offers a starting point in figuring out what to grow.  Perhaps the initial approach in using these tables would be to scan those combinations least likely to yield beneficial results (the red circles), and then move on to the good companion pairings.

Is owning a book on companion planting an absolute must for the gardener?  Personally, we feel that you can get sufficient information to jot down notes from library books or from the Web.  However, if you love to experiment and collect gardening books, then look through the book reviews on Amazon.

In our next post, we’ll cover companion planting as it relates to the contribution of flowers, herbs, and insects to your overall vegetable garden.

Read Full Post »

The publicity surrounding the White House garden just hit The New York Times yesterday, and is spreading like wildfire among avid vegetable gardeners.  We took a peak at the layout as spec’d by Assistant White House Chef, Sam Kass.

To figure out exactly what he had in mind, we recreated the White House vegetable garden layout on Plangarden (click on image):

Check out Plangarden layout of proposed White House veggie garden!

Check out Plangarden layout of proposed White House veggie garden!

It’s fabulous to see that the beds will have good companion flowers like marigolds and nasturtiums to attract beneficial insect and pollinators.  The choice of crops appears to be weighted to those plants most likely to succeed, esp. in the hands of school children who are going to be involved in planting and maintaining it.  However,

  • There’s way too much spinach!  How about some easy-to-grow bok choi? And once July comes around, the four beds of spinach will have to be replaced by something, hopefully a light-feeding, heat-tolerant veggie.  Perhaps a late harvest heirloom tomato.
  • Speaking of which … where are the TOMATOES?  What about potatoes?  Bush 😉 and pole beans?  Cucumbers?  Bell peppers?  Green onions?  Corn?  Gosh, these are no-brainer, sure success veggies.  Malia and Sasha are sure to enjoy cherry tomatoes through the early autumn.
  • With all that nitrogen-hungry spinach, crop rotation has got to be in the plan as well.  We suggest that at least two different plans are created:  one for early, and one for mid-season.  The First Family is sure to enjoy garlic in their meals, so that’s a good one to plant in October.
  • We seem to be missing items mentioned in the NYTimes article like the tomatillos, hot peppers and basil.  An oversight, perhaps.

So what do you think about Sam Kass’ proposed layout?

Read Full Post »

Older Posts »