Feeds:
Posts
Comments

Archive for the ‘Main course’ Category

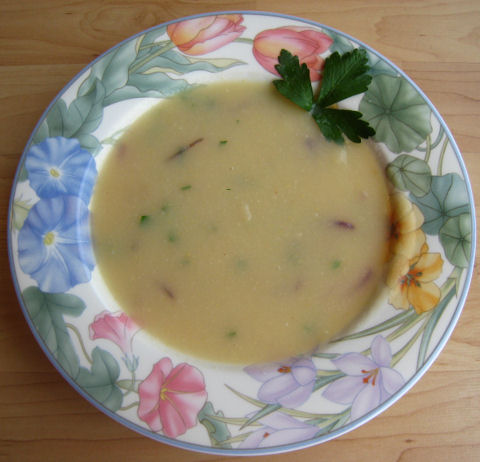
Celeriac soup with red onions and Italian parsley

Celeriac soup with red onions and Italian parsley

Celeriac, or celery root, is one of my favorite vegetables … but my all-purpose kitchen knife must be razor sharp or I won’t even consider it on the menu. This root’s knobby outer layers are a toughie to carve off, not to mention dangerous, with a dull knife. But when you’ve peeled off the hairy outer layers, you’re left with a lovely white root that lends one of the most sublime flavors to soups and purées.

Celeriac

Celeriac

Warning: working with celeriac is a messy business and you may be shocked to see how much of the outer layer has to be sloughed off. But don’t worry, it’s worth the effort. Celeriac soup is truly out of this world.

INGREDIENTS:

  • 2 large (about 4″ diameter) celery root bulbs, cut up in 1/2″ cubes
  • large bowl of cold water w/ juice of 1 lemon
  • 1 1/2 – 2 quarts soup stock (chicken or vegetable). If possible, use water used to cook celeriac cubes – see below – and add bouillon.
  • 1 medium red onion, diced
  • parsley (Italian, vs. curled, parsley somehow goes better)
  • olive oil
  • Blender

Carve off the tough, fibrous outer layer of the celery root till you’re left with a mostly white fleshy bulb. Then cut up the root to make ~1/2″ cubes.  Put cubes in the cold lemon bath to prevent browning. When all the celeriac has been cubed, boil about a quart of water in a medium pot. Remove celeriac cubes from lemon bath, and add to boiling water. Discard lemon bath. Cook for about 20 min. You’ll know it’s done when a fork can easily go through a cube, but take care not to overcook.

Cubed celeriac

Cubed celeriac

Remove cubes from water and let cool in a bowl. Save the water to make your soup stock, as you’ll want to retain that wonderful flavor! I’ll add homemade chicken stock, a few bouillon cubes, or a couple of spoons of “Better Than Bouillon“.

In a soup pot, heat up olive oil and add diced onions. I love caramelized onions and sauté till they’re golden brown. Turn heat to medium-low. Just before the onions are ready, put about 1 cup of cooled broth in the blender and add another cup or two of the cooked diced celeriac. Purée till it’s nice and smooth, like mashed potatoes. Add to pot with onions.

Do this for the rest of the celeriac, always stirring the purée in the mix. When done, add the rest of the soup stock. Adjust the amount of soup stock to get the desired thickness of your soup. Gently heat but do not boil.

Sprinkle Italian parsely (a relative of carrots, celery and celery root in the Apiaceae family) into each bowl before serving. Bon appetit!

P.S. Making celeriac purée in place of mashed potatoes is very easy. Follow the recipe but limit the amount of liquids. You can add cream to give the purée some body. Or add peeled, cubed apples to combine flavors.
Read Full Post »

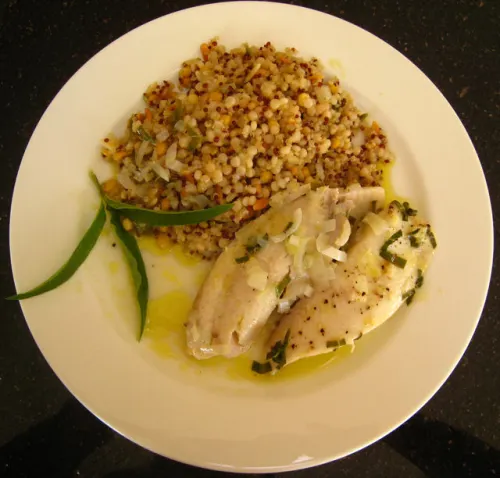
Baked Tilapia with Lemon Verbena & Harvest Grains Blend

Baked Tilapia with Lemon Verbena & Harvest Grains Blend

This incredibly fast, no-brainer recipe works for seafood like halibut, tilapia, salmon (wild Alaskan is better than farmed), sea and bay scallops, shrimp, etc. Lemon verbena is so easy to grow, and versatile, too! Works as an herb seasoning as well as a lovely tea! Make cuttings, plop it in a vase or glass and place it next to your workstation to envigorate your surroundings!

INGREDIENTS

  • Olive oil, 1/2 cup
  • Veg or chicken stock, 1/2 – 1 cup
  • White wine (optional; I like sauvignon blancs), to taste.  Let your inner Julia Child emerge!
  • Sweet onion, diced
  • Salt & pepper
  • Seafood, about 1 1/2 lbs.
  • Sprigs of lemon verbena
  • Juice of 1 lemon
Lemon verbena is a delightful herb!

Lemon verbena is a delightful herb!

Preheat oven to 400F/204C.  In a large baking dish, mix olive oil, stock, lemon juice, about 1/2 tblspn salt, wine (optional), and about 8 roughly chopped leaves of lemon verbena. Place in oven for about 10 min. to soften onions.

Remove from oven and add seafood, taking care to baste it with liquids and onions. Add a few more chopped lemon verbena leaves, and pepper, to taste. Bake another 10-15 min. or till done (test after 10 min.)  Serve with rice, quinoa, or this gem of a find “Harvest Grains Blend” from Trader Joe’s.  It contains couscous, orzo, baby garbanzo beans, and red quinoa.

Enjoy!

Read Full Post »

Maybe it was the temp of 160F or the ammonia gas, but somehow I got the notion that I could cook in the compost bin and had to figure out IF and HOW I could pull it off.

How to get compost pile hot:

A hot compost pile is a delicate balance, and sometimes a freak accident, which is how I got this foolish notion of using it to cook food. It is the combination of ingredients, moisture, mass and air.

  • Ingredients: Entire books are written about the ingredients and ratios for compost. For hot composting, it takes lots of finely-chopped greens. I get a garbage can of grass clippings each week when Odilon, our friendly neighborhood gardener, happily disposes of our neighbors’ grass clippings into our compost bin. Grass is a nitrogen-rich “green” ingredient has to be mixed well with compost “browns” like dried leaves, wood chips, straw (preferably chopped). I have gotten very hot compost with materials like straw bedding from sheep, and mushroom compost (which is woodchip mixture used for growing mushrooms). I keep browns on the side and mix in.
  • Moisture: A balancing act between too wet and too dry. It should be damp. If you grab a handful, you should be able to squeeze a little water out. Others describe it as a damp wash cloth.
  • Mass: A small pile will never be able to get hot. I have gotten hot compost with as little as 2/3 of a cubic yard (3ft x 3ft x 2ft) This is enclosed in a bin which also helps retain the heat.
  • Air: Straw and wood chips also help form air pockets and keep the grass from matting up. Then I turn my pile from either twice a week or every other day to get more air mixed back in. To get hot, your compost pile needs a few days to sit and build up heat.

Why to NOT make compost that hot!

While having a compost pile at 160F/71C is good if you want to cook a meal, it is not as good if you want to use it for your garden. Somewhere above 130F you will start to smell ammonia. This is your compost pile releasing nitrogen into the air. But you want nitrogen in your garden, not in your disgusted SO’s nostrils! When I am not cooking dinner, I add dirt to my compost pile which helps absorb the ammonia and regulates the temp down to 120F. In his book “Gardening When It Counts” Steve Solomon has an excellent discussion on composting, and how dirt acts like the cooling rods in a nuclear reactor to control the process. He recommends compost piles to be about 5% dirt, and I probably end up at this amount when I keep adding dirt to cool it down.

What else could you do with compost at 160 degrees?

Beleive it or not, there are REAL trials being run on how to use compost heat being used on a farm. It’s a large PDF file to download, but really worth reading and very educational.

There were many other questions about this video that were asked on Twitter. If you want me to go into more details on other parts of the process, please add a comment and I’ll be happy to answer your questions, including (heaven forbid) post the recipe.

Read Full Post »

No baseball zucchinis here!

No baseball bat zucchinis allowed!

It is summer time. The birds are singing, bees are buzzing and someone is standing by the side of the road looking for anyone driving by with a window rolled down so they can chuck a zucchini in it.

I have heard all the stories: “I just planted 1/2 the package of seeds. Who woudda thunk?” -or- “It was wee-sized on Friday, and when we got back from the weekend camping trip, we found a baseball bat in the garden!”

There’s only so much zucchini bread, cookies, parmesan, etc. that one can consume in the summer, so here’s one that you can enjoy in the colder months. I got this from my mom, who got it from my great aunt of German origin. So I can trace this back to at least the early 1900s. We don’t have zucchinis this year, so we won’t get to whip this up, but I have fond memories of this delicious relish as a young boy.

Zucchini Relish

  • 8 cups zucchini – grated
  • 2 cups onions – finely diced
  • 1 large green pepper – finely diced
  • 2 1/2 tablespoons of salt

Mix well and let stand overnight in a cool place or refrigerator. The following day, rinse well with cold water and drain.  Set aside.

Combine the ingredients below.

  • 1 1/2 cup white or cider vinegar
  • 3 cups sugar
  • 1/2 tsp dry mustard
  • 3/4 tsp black pepper
  • 1/2 tsp nutmeg
  • 1/2 tsp cornstarch
  • 1/2 tsp turmeric
  • 1/2 tsp celery seed

Cook until it starts to thicken. Add the zucchini mixture above and mix well.

Cook for another 20 minutes and seal in jars.  ENJOY!

Read Full Post »

Vigorous & delicious Swiss chard

Vigorous, delicious, beautiful Swiss chard

I have often seen school gardens with vibrant, beautiful chard leaves left to wither. How sad! Chard belongs to the same family as Spinach (Amaranthaceae), does not have a chalky taste, and can often be used in spinach recipes. This recipe (an adaptation of one of the many variants of Boston Market Creamed Spinach) can be modified in many different ways, including as a creamy sauce over baked chicken or pork, sprinkled with buttered bread crumbs!

INGREDIENTS

  • Fresh chard leaves from garden, about 1 very large bowl (about 1.5 gal/6 litre capacity).  I don’t use stems but these can be set aside for a stir fry meal.
  • 6 tablespoons butter
  • 3 tablespoons flour
  • 1.5 – 2 cups chicken broth, milk or a mixture of both
  • 1/2 cup grated Asiago cheese (Parmesan, Romano, Gruyere also do fine)
  • 3 tablespoons olive oil (I use mild-tasting non-virgin)
  • 2-4 cloves garlic – minced
  • 1 medium onion – diced

There are 3 parts in preparing the meal:

  1. Harvest a very large bowl of chard leaves and steam till cooked but not overdone.  Overcooked chard or spinach is yech, so it’s best to undercook. You just want the leaves to soften. You should end up with at least 2 cups of chard.  Let drain and cool. Chop them up in large chunks so they’ll be easy to mix in with the sauce.
  2. Make a roux: Melt ~6 tablespoons of butter. Add ~3 tablespoons of flour. Mix well. Then add 1.5 – 2 cups of chicken broth or milk or a mixture of both. Mix well till smooth. Then add about 1/2 cup grated Asiago cheese (Parmesan, Romano, Gruyere also do fine). The consistency should not be too thick/heavy or too watery.
  3. In a separate pan, heat about 4 tablespoons of olive oil. When hot, add minced garlic and diced onions till golden or caramelized. Add the chard and saute about 3-5 minutes. Slowly add the roux and mix well. Taste before seasoning with any additional salt. Add spices like pepper and nutmeg to taste.

Bon appetit!

Voilà! A fabulous accompaniment or use it as a flatbread dip

Voilà! A fabulous accompaniment or use it as a flatbread dip

Read Full Post »

Older Posts »