Feeds:
Posts
Comments

Posts Tagged ‘recipe’

Snickerdoodles Recipe

Enjoy warm snickerdoodles with milk, tea or coffee!

This recipe is credited to James Beard, whose recipe book I’ve had since the 70’s. A foodie friend told me that he was not a model of restraint with respect to butter, but that’s just fine with me as we consume probably a pound of butter a week, sometimes more.

These cookies are best enjoyed when fresh out of the oven!

Ingredients:

Sift together and set aside flour mixture:

  • 3 cups all-purpose flour
  • 3/4 teaspoon baking powder
  • 1 teaspoon cream of tartar
  • 1/2 teaspoon salt

In a small bowl, mix

  • 5 tablespoons raw cane sugar (or granulated white, but raw cane is better)
  • 1 tablespoon cinnamon powder

Preheat oven to 375F (190C). Butter the cookie/baking sheet.

Cream:

  • 1 cup softened butter till fluffy, then
  • Gradually add 1 1/2 cups sugar. Beat till fluffy. Then add (mix between ingredients)
  • 1 teaspoon vanilla
  • 2 eggs
  • 1/4 cup milk

Combine well till mixture is smooth and creamy.

Gradually add the flour mixture till well-combined.

Using two teaspoons, put small dollops of snickerdoodle dough about 2″ apart on the baking sheet. It will look like a gooey mess – don’t worry. Then generously sprinkle the sugar/cinnamon mixture on the top. Don’t worry if the sprinkles miss the dough because upon baking, the dough will rise and expand and pick up the sprinkles.

Bake approximately 10-12 min. till the sides of the snickerdoodles are light brown. Depending on the size of the snickerdoodles, this recipe can make up to 6 dozen/72 snickerdoodles! Best served warm.

Enjoy!

Read Full Post »

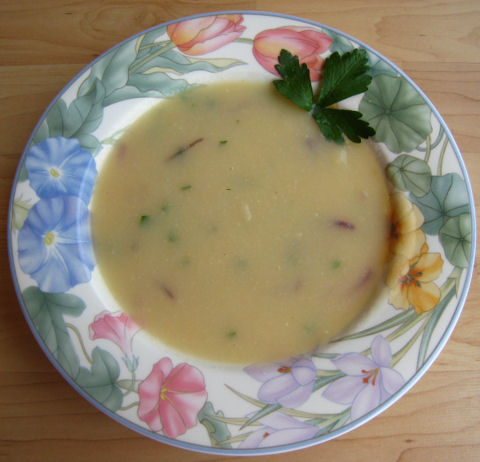
Celeriac soup with red onions and Italian parsley

Celeriac soup with red onions and Italian parsley

Celeriac, or celery root, is one of my favorite vegetables … but my all-purpose kitchen knife must be razor sharp or I won’t even consider it on the menu. This root’s knobby outer layers are a toughie to carve off, not to mention dangerous, with a dull knife. But when you’ve peeled off the hairy outer layers, you’re left with a lovely white root that lends one of the most sublime flavors to soups and purées.

Celeriac

Celeriac

Warning: working with celeriac is a messy business and you may be shocked to see how much of the outer layer has to be sloughed off. But don’t worry, it’s worth the effort. Celeriac soup is truly out of this world.

INGREDIENTS:

  • 2 large (about 4″ diameter) celery root bulbs, cut up in 1/2″ cubes
  • large bowl of cold water w/ juice of 1 lemon
  • 1 1/2 – 2 quarts soup stock (chicken or vegetable). If possible, use water used to cook celeriac cubes – see below – and add bouillon.
  • 1 medium red onion, diced
  • parsley (Italian, vs. curled, parsley somehow goes better)
  • olive oil
  • Blender

Carve off the tough, fibrous outer layer of the celery root till you’re left with a mostly white fleshy bulb. Then cut up the root to make ~1/2″ cubes.  Put cubes in the cold lemon bath to prevent browning. When all the celeriac has been cubed, boil about a quart of water in a medium pot. Remove celeriac cubes from lemon bath, and add to boiling water. Discard lemon bath. Cook for about 20 min. You’ll know it’s done when a fork can easily go through a cube, but take care not to overcook.

Cubed celeriac

Cubed celeriac

Remove cubes from water and let cool in a bowl. Save the water to make your soup stock, as you’ll want to retain that wonderful flavor! I’ll add homemade chicken stock, a few bouillon cubes, or a couple of spoons of “Better Than Bouillon“.

In a soup pot, heat up olive oil and add diced onions. I love caramelized onions and sauté till they’re golden brown. Turn heat to medium-low. Just before the onions are ready, put about 1 cup of cooled broth in the blender and add another cup or two of the cooked diced celeriac. Purée till it’s nice and smooth, like mashed potatoes. Add to pot with onions.

Do this for the rest of the celeriac, always stirring the purée in the mix. When done, add the rest of the soup stock. Adjust the amount of soup stock to get the desired thickness of your soup. Gently heat but do not boil.

Sprinkle Italian parsely (a relative of carrots, celery and celery root in the Apiaceae family) into each bowl before serving. Bon appetit!

P.S. Making celeriac purée in place of mashed potatoes is very easy. Follow the recipe but limit the amount of liquids. You can add cream to give the purée some body. Or add peeled, cubed apples to combine flavors.

Read Full Post »

Baked Tilapia with Lemon Verbena & Harvest Grains Blend

Baked Tilapia with Lemon Verbena & Harvest Grains Blend

This incredibly fast, no-brainer recipe works for seafood like halibut, tilapia, salmon (wild Alaskan is better than farmed), sea and bay scallops, shrimp, etc. Lemon verbena is so easy to grow, and versatile, too! Works as an herb seasoning as well as a lovely tea! Make cuttings, plop it in a vase or glass and place it next to your workstation to envigorate your surroundings!

INGREDIENTS

  • Olive oil, 1/2 cup
  • Veg or chicken stock, 1/2 – 1 cup
  • White wine (optional; I like sauvignon blancs), to taste.  Let your inner Julia Child emerge!
  • Sweet onion, diced
  • Salt & pepper
  • Seafood, about 1 1/2 lbs.
  • Sprigs of lemon verbena
  • Juice of 1 lemon
Lemon verbena is a delightful herb!

Lemon verbena is a delightful herb!

Preheat oven to 400F/204C.  In a large baking dish, mix olive oil, stock, lemon juice, about 1/2 tblspn salt, wine (optional), and about 8 roughly chopped leaves of lemon verbena. Place in oven for about 10 min. to soften onions.

Remove from oven and add seafood, taking care to baste it with liquids and onions. Add a few more chopped lemon verbena leaves, and pepper, to taste. Bake another 10-15 min. or till done (test after 10 min.)  Serve with rice, quinoa, or this gem of a find “Harvest Grains Blend” from Trader Joe’s.  It contains couscous, orzo, baby garbanzo beans, and red quinoa.

Enjoy!

Read Full Post »

For breakfast or tea time, maple walnut scones are a hit!

For breakfast or tea time, maple walnut scones are a hit!

This maple walnut scone recipe is a significantly-modified Joy of Cooking scone recipe. Scones can sometimes taste like dry icky biscuits, and it took quite a bit of experimentation to finally get it just as we love it, so we hope you’ll enjoy it, too!  I am writing this exactly as I prepare the scones. Scroll down to see the ingredients.

Grease and flour a cookie sheet.  Set aside.  Preheat oven to 425F or 218C.

In a small bowl, combine egg, heavy cream, maple syrup, and imitation maple flavoring (Alas, the maple syrup alone does not give it enough of a maple “zing” to come through!). Set aside in fridge.

In a large mixing bowl, sift flour, baking powder, salt, and sugar.  I use a dry whisk to mix it well.  Take butter out of fridge and cut up in little 1/2″ cubes; add to flour mix.  Once all the butter is cut up, I use my fingers to work it in the flour until the chunks are mostly broken up and incorporated in the mix.  You don’t need to go crazy to make this completely homogenous.  You just want to break up the butter, but do take care to keep the butter cold or the scones will not rise properly.

Add nuts to flour mixture and mix in with fingers till blended.

Make a little well in the center of flour/nut mix.  Pour in the egg/cream/syrup mixture that you took out of the fridge.  Set this small bowl aside as you may need it again (read on). With a large spoon, blend the liquid and dry ingredients till most of the liquid is taken up.  Do this gently as overworking the mixture will yield hard scones.

Now with your fingers, continue blending the liquid and dry ingredients till you’ve cleaned up the bowl of any dry clumps.  Gently work the ingredients together into a nice ball of dough, taking care NOT to knead the dough as you would with bread.  Kneading yields hard scones 😦 If your dough is too dry and won’t stick together, dab it along the inside of the small bowl that contained the wet ingredients to moisten it up.

On a floured surface, gently flatten out your ball into a circle about 9 inches in diameter and ~1/2 ” thick.  This may take a few “flips” of the dough to get it just right.  You’ll want to keep adding some flour to prevent it from sticking to the surface.  Cut up the circle into 8 triangle wedges as you see on the photo.

Place the wedges about 1/2″ away from each other on the cookie sheet.  Bake for 15 min. till scone is slightly brown on underside.  The scones should have risen at least 2x its pre-baking height.

While baking, prepare the glaze.  Mix the confectionary sugar, imitation Maple flavor, maple syrup, vanilla flavor till well blended.  Add 1/2 teaspn of water at a time till you get a nice viscous mixture, similar to ranch salad dressing.

When scones are done and still warm, brush the glaze over the top of each scone. I found a really cool silicone brush which does a great job and cleans out beautifully.

Serve warm with your favorite beverage.  ENJOY!

INGREDIENTS

  • 2 cups sifted all purpose or pastry flour
  • 1 tablespn finely sifted baking powder (caked baking powder will NOT work, so I put it through a small mesh strainer like those used for teas)
  • 1/2 tsp salt
  • 3 tablespns brown sugar
  • 6 tablespns COLD butter.  Leave in fridge until ready to use!
  • 1 egg, slightly beaten
  • 1/4 cup heavy cream
  • 1/4 cup maple syrup; keep extra maple syrup (about 1 tablespn) on side to make glaze
  • 1 1/2 tablespns imitation Maple flavor (from McCormick)
  • 1 cup finely ground walnuts
  • GLAZE:  1/2 cup confectionary sugar, 1 teaspn. imitation Maple flavor, 1 teaspn. vanilla extract or imitation vanilla flavor, 1 tablespn. maple syrup, a little water to add 1/2 teaspn. at a time

Read Full Post »

Who’s Mrs. Campbell? Well, she’s the mom I used to babysit for back in the 70’s. I loved her kids. They introduced me to things like Goober Grape and Jet-Puffed Marshmallow Creme. At the age of 14, I already knew what NOT to feed my kids (sorry Mrs. C, wherever you are).

However, she did share this wonderful recipe with me, and this has been my all-time favorite “bread” in the summer months with the usual limitless supply of zucchini (not this year though!).  So here it is:

Zucchini Bread

Ingredients:

  • 3 large eggs
  • 1 cup white sugar, 1 cup brown sugar
  • 1 cup vegetable oil
  • 2 cups peeled & grated raw zucchini
  • 3 tsps. vanilla
  • 3 cups flour
  • 4 tblspns flax seed meal (I throw this in most breads, but it’s optional)
  • 1 tspn. baking soda
  • 1/4 tspn. baking powder
  • 3 tspns. cinnamon powder
  • 1 cup coarsely chopped nuts (walnuts or pecans work well)

Preheat oven to 350F or 177C. Grease two 4″x8″ or bread loaf pans.

Beat the eggs till fluffy and light.  Gradually add the sugar.  Then slowly beat in the vegetable oil and vanilla.  Add zucchini and mix well (no need to beat, just mix well with wooden spoon till homogenous).

In a separate bowl, mix flour, baking soda, baking powder, optional flax meal and cinnamon with a whisk.  Gradually add the flour mixture to the wet ingredients.  Finally add in the chopped nuts.  Pour into pans.

Bake for about 1 hr. and cool on rack.  ENJOY!

Read Full Post »

Older Posts »